Our lesson template is kept in the carpentries/styles repository. The styles
repository is carefully curated so that changes made to it are easily mergable by downstream
lessons. The styles repository contains various bits that take Markdown files and render them as a
lesson web page. For more information on how to develop lessons and maintain them, see our
lesson-example. It will walk you through the basics of lesson design and how to
use GitHub, Markdown and Jekyll for lesson development. Follow the instructions below to make your
own empty lesson in your own GitHub account. Once you’ve done that you can just write Markdown code
and have lesson web pages just like the lesson-example and all of our other
lessons, but with your lesson content.
Requirements
- A GitHub account
- A working Python 3.4+ environment to run the lesson initialization script
- (Optional) A local install of Jekyll (version 3.2 or higher) which will require the Ruby language to be installed.
Creating a New Lesson
We will assume that your user ID is timtomch and the name of your
new lesson is data-cleanup.
-
We’ll use the GitHub’s importer to make a copy of this repo in your own GitHub account. (Note: This is like a GitHub Fork, but not connected to the upstream changes)
-
Put the URL of the styles repository, that is https://github.com/carpentries/styles in the “Your old repository’s clone URL” box. Do not use the URL of this repository, as that will bring in a lot of example files you don’t actually want.
-
Select the owner for your new repository. In our example this is
timtomch, but it may instead be an organization you belong to. -
Choose a name for your lesson repository. In our example, this is
data-cleanup. -
Make sure the repository is public.
-
At this point, you should have a page like this:
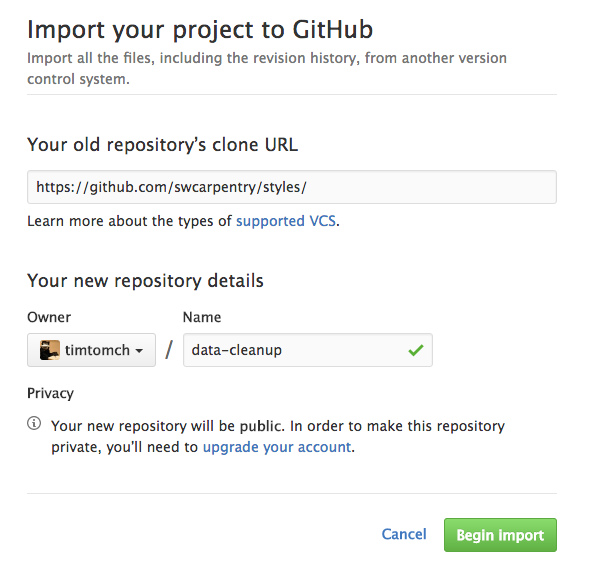
You can now click “Begin Import”. When the process is done, you can click “Continue to repository” to visit your newly-created repository.
Through the Github interface you can begin to edit and
-
If you want to work on the lesson from your local machine, you can now clone your newly-created repository to your computer:
$ git clone -b gh-pages https://github.com/timtomch/data-cleanup.gitNote that the URL for your lesson will have your username and chosen repository name.
-
Go into that directory using:
$ cd data-cleanupNote that the name of your directory should be what you named your lesson on the example this is
data-cleanup. -
To be able to pull upstream style changes, you should manually add the styles repository as a remote called
template:$ git remote add template https://github.com/carpentries/styles.gitThis will allow you to pull in changes made to the template, such as improvements to our CSS style files. (Note that the user name above is
carpentries, nottimtomch, since you are adding the master copy of the template as a remote.) -
Configure the
templateremote to not download tags:$ git config --local remote.template.tagOpt --no-tags -
Make sure you are using the
gh-pagesbranch of the lesson template:$ git checkout gh-pagesThis will ensure that you are using the most “stable” version of the template repository. Since it’s being actively maintained by the Software Carpentry community, you could end up using a development branch that contains experimental (and potentially not working) features without necessarily realising it. Switching to the
gh-branchensures you are using the “stable” version of the template. -
Run
bin/lesson_initialize.pyto create all of the boilerplate files that cannot be put into the styles repository (because they would trigger repeated merge conflicts). -
Create and edit files as explained further in the episodes of this lesson.
-
(requires Jekyll Setup from below) Preview the HTML pages for your lesson:
$ make serveAlternatively, you can try using Docker:
$ make docker-serve -
Commit your changes and push to the
gh-pagesbranch of your repository:$ cd data-cleanup $ git add changed-file.md $ git commit -m "Explanatory message" $ git push origin gh-pages -
Tell us where your lesson is so that we can add it to the appropriate index page(s).
Notes
-
SSH cloning (rather than the HTTPS cloning used above) will also work for those who have set up SSH keys with GitHub.
-
Once a lesson has been created, please submit changes for review as pull requests that contain Markdown files only.
-
Some people have had intermittent errors during the import process, possibly because of the network timing out. If you experience a problem, please re-try; if the problem persists, please get in touch.
Setup Instructions for a specific existing lesson
-
Installation instructions for core lessons are included in the workshop template’s home page, so that they are all in one place. The
setup.mdfiles of core lessons link to the appropriate sections of the workshop template page. -
Other lessons’
setup.mdinclude full installation instructions organized by OS (following the model of the workshop template home page).
Jekyll Setup for Lesson Development
Though not essential, it is desirable to be able to preview changes on your own machine before pushing them to GitHub.
In order to preview changes locally, you must install the software described below.
-
Ruby.
Linux/macOS: Ruby is usually included with Linux and macOS — this is usually sufficient to preview your changes locally.
If you aren’t able to preview reliably with your default Ruby installation, you can use the same version of Ruby as GitHub. Currently, GitHub uses Ruby 2.5.3. In order to install Ruby 2.5.3 on Linux and macOS, we recommend using rbenv:
rbenv install 2.5.3And then instructing
rbenvto use it in your lesson development process by executing the following command from your lesson directory:rbenv local 2.5.3To install
rbenv, please use rbenv-installer.Windows: Please use RubyInstaller to install Ruby on Windows.
Upon installing Ruby, check its version by executing
ruby --versionWindows users should select the start menu option
Start command prompt with Rubyto execute the above command.For more information, see the Ruby installation guidelines.
-
RubyGems is a tool which manages Ruby packages. It should have been installed along with Ruby and you can test your installation by running
gem --version -
Jekyll. You can install this by running
gem install jekyll. On macOS, a user does not have a permission to write to/Library/Ruby/Gems/. Rungem install jekyll --user-installinstead. -
R Packages. We use knitr, stringr, and checkpoint to format lessons written in R Markdown, so you will need to install these to build R lessons (and this example lesson). The best way to install these packages is to open an R terminal and type:
install.packages(c('knitr', 'stringr', 'checkpoint', 'ggplot2'),
                 repos = 'https://cran.rstudio.com', dependencies = TRUE)
If you want to run bin/lesson_check.py (which is invoked by make lesson-check)
you will need Jekyll (so that you have its Markdown parser, which is called Kramdown)
and the PyYAML module for Python 3.